December 18, 2022

Rebel in the Making - Part 20 (done!)

I am happy to say that Rebel Just for Kicks is done, with all his hairdos! If you want to follow his creation from the beginning, start here. It was a bit of trial and error, as most creations are. Not perfect, but I'm pretty pleased overall. 

Which is your favorite look? 

Hunter Rebel

Pleasure Rebel

Speedy Rebel


And some peeks at Rebel styling his dos in a variety of performance classes at QVPO...


December 11, 2022

Rebel in the Making - Part 19 (all the hairdos!)

I chronicled the making of Rebel Just for Kicks, my 2022 NaMoPaiMo horseon the blog almost through completion. Technically, I finished him for NaMoPaiMo. His paint job was done. However, part of his creation was to explore making magnetic, interchangeable manes and tails. I just ran out of time to finish making all the manes and tails. 

I took him to a show in the spring and showed him in halter with the bottom of a tail that fit over the mud knot. I decided it wasn't tidy enough to show him in halter, so I permanently attached the bottom of his tail and sculpted it into the braided section so there was no seam. 

I think that was a good choice, as he earned a NAN Top Ten (thanks to the buy-in!)

Rebel Just for Kicks
NAN 2022 CM Paint

But, Rebel was intended to be an all-around performance horse. In typical fashion, it took having a show coming up to spur me to action. I started by cutting up the first iterations of his tails, since he now had a full bottom to this tail instead of the mud knot, like originally planned. Then I covered him in plastic wrap so that I (*hopefully*) didn't get any epoxy or glue on him. 


The pleasure mane was decent, though a little bulky, so I sanded and tweaked it. The long mane had potential, but needed work. His tails needed a lot of attention. You can see in the picture above where they were trimmed down and new wires fixed into place with soda glue. 


Figuring out how to get the braids covered and 
blended into the existing tail was going to be interesting...


I also wanted to make sure the long mane worked with tack. 
I ended up snapping a piece to flow out over the top of the saddle. 
The wire mesh didn't break underneath, so I was able to soda glue it 
into the new position and sculpt over it.


Also tried to make the dock look natural with the tail sitting on top of the braids.


This is the pleasure tail after I sculpted the length of the tail. 
There is a gap at the bottom between the permanent tail and the top piece. 


Long mane after several different sculpting sessions. 
Having lots of windows (open spaces) in the mane 
helped to keep the weight down and show movement. 


Work on his speedy tail. Again, I tried working with what I already had
and blending into the permanent tail.


This side had a weird area that I wanted to address.


I tried something new, which I'm now going to use many times over. 
I wrapped the wire sculpting mesh with painters tape, then used soda glue to harden it. 


Here I've attached the piece to the underside
of the top piece. Trying out the fit here before sculpting. 


This is the underside of the tail where you can see the attachment of the 
new piece with soda glue. 


Another piece added on the other side to give the tail a little more movement. 
Going for a slight wave at the bottom of the pleasure tail. 


Trying it out for fit. 


This time I made a cone with the mesh, wrapped it with tape, 
and soda glue to stiffen it. 


Attached the cone to the speedy tail in that weird area I wanted to address. 
Haven't tried this before. The other ends are all supported with wire underneath.


Pleasure tail with epoxy, sculpting in the wave along the bottom. 


Trying on the pleasure tail for size. 


Trying on the speedy tail. 


Other side of the speedy tail. I added some more sculpting around 
the thin areas before I finished.


Somewhere along the line, the embedded magnets in the tail were set too far
away from their counterparts buried in the braided tail. These little magnets are strong, so I just
stacked a couple more on top of each one.


Then I set them in place with soda glue, trying not to cover them up. 

Once I was content (enough - not perfect, but decent) with the manes, tails, and forelocks, I primed them in dark grey primer, then painted them black with acrylics. 

His first big performance debut was at QVPO 2022. I showed him in every class (except Saddleseat and Arabian Costume, of course) and had so much fun mixing and matching his hairdos. 

Next time, the big reveal (because I couldn't end the series on Part 19!)!


November 8, 2022

Sunday Stroll - more than a decade in the making...

Sunday Stroll has lived up to his name, taking his sweet time. The name was supposed to imply, as a Thoroughbred from Sunday Silence lineage, that running is as easy as a Sunday stroll. LOL

Valor Resin (Carol Williams) with Replay Resin Head/Neck (Brigitte Eberl)
customized by Danielle Feldman

I shared an in progress picture of him more than 10 years ago, and I have no idea how long before that I worked to get him to that point. When I signed up for Heather Bullach's painting a dapple grey in oils class fall of 2021, she recommended we use a traditional scale model. I have had this guy's color in mind since the beginning, so I figured it was time. After some minor tweaking to the mane and tail, I got him prepped almost in time to start with a painted base layer. 
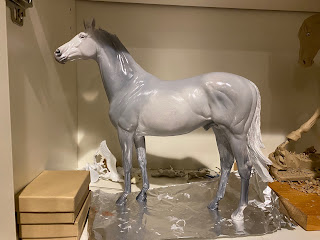
Streaky is pretty normal for a first layer, but this is way too light


Layer 2 I got a little bolder. 

I was a little nervous to apply newly learned skills to a model where I have a specific image in mind. Maybe that's why I was the slowest one in the class to make progress. 

Painting when I have the energy to focus and enough time to not feel rushed is key for me. I usually regret the results of painting when those don't align for me, so I took the pressure off myself to have set expectations about keeping up with the class.

Layer 2 - Take 2 - Not enough dapple contrast with prior attempt

Layer 3 - starting to detail the body

But Heather does an amazing job of taking the mystery out of oils so that I kind of knew where I was headed with each next step (thank you, Heather!). 

Then the class ended last fall, and he has been waiting on my shelf for almost a year... I'm guessing that last oil layer is probably dry by now, ha ha. Sunday Stroll continues to live up to his name. Maybe I'll finish painting him in the next decade?


September 17, 2022

Brandenburg


Brandenburg
2022 BreyerFest Best Customs Contest prize model
Limited Edition of 6 models in this colorway

This lovely original finish model is the prize model for the winning entries of the BreyerFest Best Customs Contest this year. I was extremely honored to win the Excellence in Performance division with my Donkey Nanny set-up.  Here are a bunch of pictures for everyone to enjoy!
Any little white flecks are lint from my cotton gloves.