Showing posts with label how to. Show all posts

February 12, 2023

Lengthening a Back


 Took these pictures while customizing Bella Nadell (Nadell was my grandmother's middle name, which she hated but I adore!). I never got around to putting together a blog post on it 
until now (because what else am I going to do during the Super Bowl?)

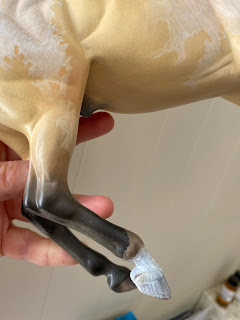
I was planning to add metal shoes, which made her look like she was on stilts. Even though she was already (mostly) customized and prepped, I knew I wouldn't be happy with her if I didn't take the plunge and lengthen her back. I probably could have gone longer, but at the time it looked like a HUGE change. 

 I started by cutting her in half with a dremel cutting wheel.

I found the path that would cut through the least amount of detail and marked it before making the cut. There is no other reason why I did it on an angle. I wanted to preserve all the original detail so that it blended together without looking like she'd had surgery. 


Then I used a sanding drum to sand down the edge of the cut. This makes for a 
smoother transition when adding in the epoxy later. 


Since she had some thicker areas of resin inside the barrel, I was able to drill a hole for 
wires and set them with soda glue (baking soda and super glue). 


Close-up with the wires installed inside the barrel. 


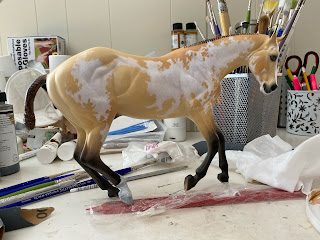
Eyeballing it for proportions and balancing her correctly. 


Then I tried something new. Using Loctite Tite Foam, I filled her inside cavity. (The bottle can really only be used once, so I also filled some areas around the house!) Use this stuff in a ventilated space. 
I sprayed it in the garage and let set before I brought her inside. 


The stuff just keeps expanding. 


Much more so than you expect!


Then I started carving away the excess. 


This is sticky, messy stuff. I'm not a fan.


I carved it down so that it was below the surface of the resin. I didn't want any of this to be on the outside surface of the model. I then filled that void with gapaxio (a 2 part epoxy), let cure, sanded my arms off for a seamless transition, and prepped for eons. Somehow there are no pictures of those steps... 

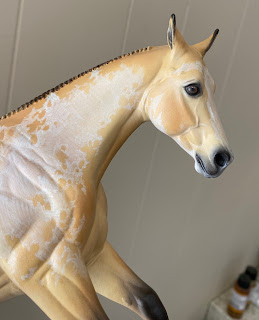
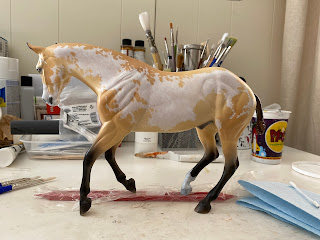
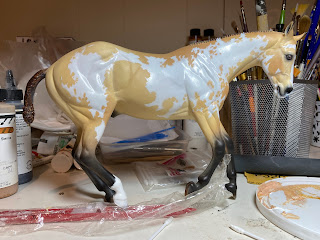
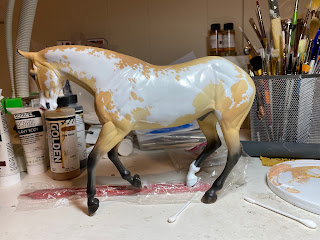
I also reworked her neck and mane before I painted her. If you're not happy with something, 
sometimes it's better to take a step backward and get it right before moving on. I've actually resculpted the neck of a completely finished model and repainted her (she went on to Champ at NAN, worth it!).


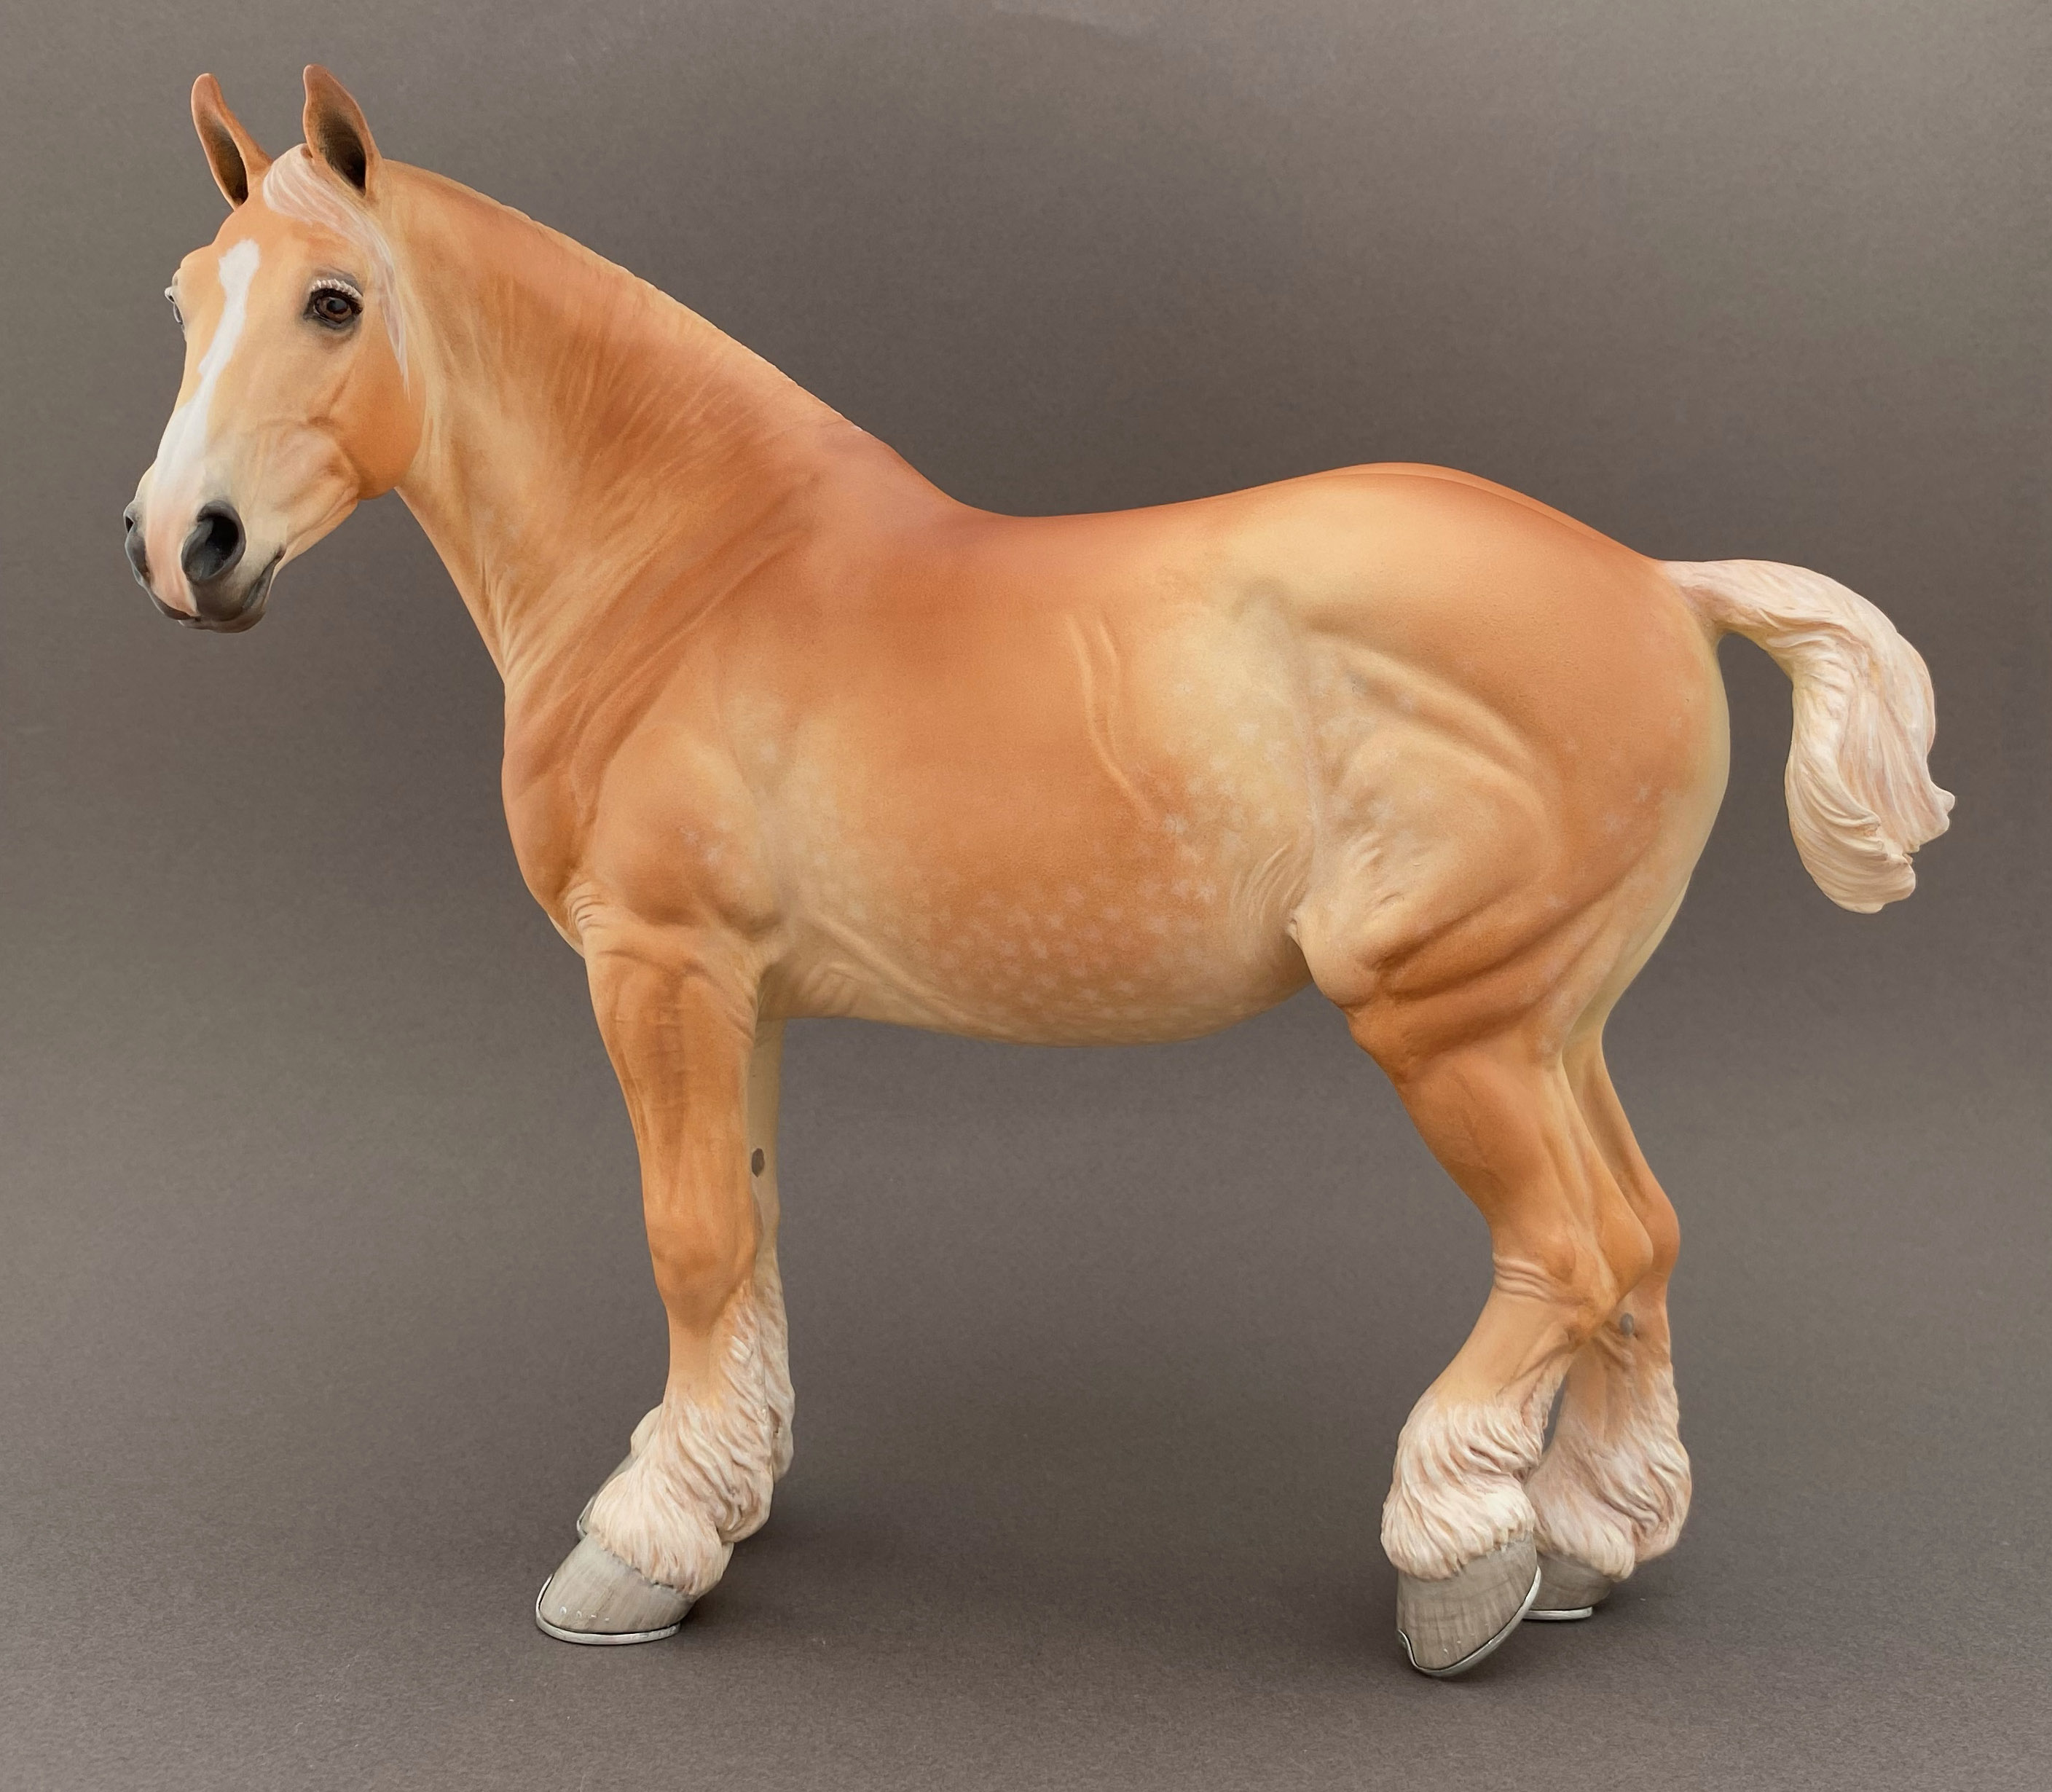
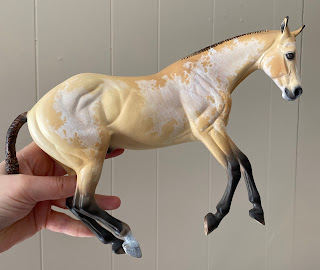
The finished Bella Nadell. You can see how the shoes make her appear even taller. 


Top Ten at NAN this summer. So glad I took the time to make those changes!

March 1, 2022

Rebel in the Making - Part 18 (details!)

My goal for NaMoPaiMo this year was to focus on better white markings. If you haven't heard already, I am loving the Faber Castell paint pen to outline and fill in the markings. In the last post, I shared my technique for smooth opaque markings, but the technique doesn't allow for refined edges and mapping. 


I first tried using a couple Jo Sonja colors, but I found they got too grainy too quickly. 
Even the glazing liquid didn't smooth the paint to my liking. 


Then I swung the other way by going to a blend of Golden fluid acrylics, which are very 'slippery' with not much tooth, but these were not opaque enough for my liking. 


The third try was just right (I'm starting to sound like Goldilocks!). I've used Lascaux titanium white before and it's been a staple in my white markings for awhile. I need to find a new source for it... I mixed in a touch of the Golden high flow acrylic titan buff, which is the same color mixed into the white marking base I talked about in the last post. That way the color should be seamless since I am hoping to focus only on the edges and not cover the entire pattern again. 


I thought natural light would be better for this picture, but not so much! Painting mapping is very tedious, so I mixed it up with doing some detail work along the way. 


I love trying out new paint colors and the Jo Sonja line has some interesting colors. On a whim, I picked up this Bisque color. When mixed with this pink craft paint, I found it made for a nice muzzle color. Now that I've found something I like,  I need to see if they still make this craft paint color, which is starting to get tacky since I've had it so long, and buy a fresh bottle.


With all the real estate that needed blending into white, it took me multiple tries. The Jo Sonja builds up texture quickly, so I wiped it off plenty of times and retried and retried. I ended up sealing it a couple of times to try to build up the color. While I loved the color, I struggled to really get a nice transition with the white paint. I added some strategic kissy spots. :)


Somewhere along the line I added some soft dapples and added some more washes, mostly titan buff to bring back that buttermilk color. The key for me is this glazing liquid. It prolongs dry time and helps to smooth the paint in place of water. I used it on the muzzle pinking, on large areas of color washes, on hooves, and in the white mixture. 


Trying another background so you can better see his color. Still too dark! But you can see the eyeball I mention a little later down.


For his shell hoof, I used the Jo Sonja bisque to build up a solid base. I didn't want to use the same beige colors I used on his body. Then I used titan buff and burnt sienna (maybe something else?) and did light washes following the growth rings. 

For his dark hooves, I used the dark pastel base and used Liquitex Neutral Gray 5 in a wash with the glazing liquid, with it more concentrated at the coronet band to create the periople. Easiest hooves I've ever painted and I personally really like them! 


For his shoes, I started by using black where the hoof meets the shoe to try to simulate shadow, as well as where the nail holes are on the hoof wall and the grooves inside the shoes. Then I used Golden Iridescent Silver (fine) to paint the shoes and the nail heads. One bottle will last you a lifetime. You can see him 'hanging out' for his hooves to dry over the edge of the table. I did the same thing when I sealed them, though I was super careful to cover up the side he lays on so that it didn't get any spray on it. 


For his eyes, I started with titan buff and burnt sienna for eye whites, followed by black for the rim of the iris. Then I filled in the eyeball with the Bisque color (you can see this a few pictures above). I probably sealed at this point. Then mixes of burnt umber, titan buff, maybe burnt sienna and probably something else? for the iris color. Sorry, I didn't take good notes! For the pupil, I laid down black in an elongated oval parallel to the ground, followed by a touch of Jo Sonja Blue Iridescent centered within the pupil. Again, a bottle of this should last a lifetime!

Rebel Just for Kicks

I am so happy to have completed him in time for NaMoPaiMo! This blog post actually covers the work I did over several days (including some really long painting sessions). 


I still have all his hairdos to finish, but Jennifer agreed that forelocks were optional for NaMoPaiMo - pshew! After I've caught up on adulting, I'll get back to work on all his interchangeable manes, tails and forelocks, so come back soon!


February 26, 2022

Rebel in the Making - Part 17


I did a little more tweaking this morning with pastels. When I used up the Krylon matte spray can I decided I was done with the pastels. Time is running out and I needed to move on.


I added more grey and black around his eyes and muzzle, as well as ear tips. I think I'll do some more acrylic washes before he's done to help blend in the transitions. I'll try to remember to do the dark skin first next time. That should make it easier to clean up. I just love this sculpture's face!


You can see where the pastels covered up the white markings quite a bit.


So I used the white paint pen to re-outline and re-fill in the white markings. 


Other side. I changed his pattern from the first iteration by adding more white.


Then I spent the day filling in his white markings. I used Golden High Flow Acrylics, introduced by Mel Miller, which she shared during last year's NaMoPaiMo. I have a bottle of titanium white that I mixed in some titan buff to warm it up. What I like about this paint is it is fairly opaque for coverage and is pretty thin so doesn't need to be watered down. 


You can see it is very shiny, but matte spray will knock that back. What this paint is not good for is the "hair by hair" detailing, so the next step will be another layer of a different white paint to cover everything again and do the detailed mapping. First I will let this cure overnight. It is a little gummy and isn't easily sandable without peeling, but I do need to try to smooth out a few areas. My goal for this year's NaMoPaiMo was to work on my white markings. I am fairly happy with the pattern, but the jury is still out on how well they turn out.

February 25, 2022

Rebel in the Making - Part 16


Time for the tweaking stage. I wasn't loving the redness in the dark areas (must have grabbed a paint mix with burnt sienna in it when I was airbrushing!), and there were bits of dark pastel here and there where it shouldn't be. So, I first tried using some 1200 grit lightly to remove any gunk or dark pastel if it was in a top layer of sealer. Then I went over him with acrylics. 


I mixed up lots of shades trying to find the right shades, as you can see on the palettes. I used the same colors in the airbrush mixes, plus Liquitex burnt sienna, burnt umber, and mixing white. Using a combination of washes and dry brush stippling, I got him to a good spot. Then I sealed him with sealer.


I went over him all over with the light gold pastel mix to bring back the metallics over the acrylics.


Next, I wanted to add some more shading on his legs. I started by using Pan Pastel Yellow Ochre Tint 270.8 to lighten the areas. I find Pan Pastels to be the most opaque of any pigment. The above picture shows the first layer over the black before I sealed it. I went through a few layers of adding the yellow to get it lighter, then I added Pan Pastel Burnt Sienna Ex. Dark 740.1 with the yellow ochre to blend the transitions. Then I used the darker golden pastel mix over the lighter areas. If I had planned ahead, I could have avoided this step of trying to lighten had I been more strategic in where I placed the dark pigment the first time. I didn't realize I wanted them shaded until I decided they were too dark...


The picture is terribly dark, so you can't really see but... After the legs were done, I used Pan Pastel Neutral Gray 820.3 on his muzzle and around his eyes (again). This time more carefully! And I added a bit of black to his ear tips. I'll take a second look in the morning to see if I want to do any more tweaking (and really hope I don't find any more stray black pastel - I made sure to check his magnets this time!). Then I really need to get going on his white markings! 3 days left of NaMoPaiMo, 1 of which is a workday, so really only 2 days left to paint in earnest! I am so excited to see him starting to come together!

February 22, 2022

Rebel in the Making - Part 15


Inevitably, on closer inspection after applying pastel, there is a lot of clean-up work. Even trying to remove pastel with a kneaded eraser where I don't want it as I go along, If I hurry at all, it backfires. Also, taking a look with fresh eyes with sunlight makes a world of difference. In the picture above, the dark skin color around his eye is too sloppy for my taste.

I spent all afternoon on Sunday trying to cover and blend in the area around his eyes using acrylic paints. I was waiting on an art supply order to do his white markings so I also started painting his eyes. Not happy with them yet. I think they're too dark and I lost his eye whites somewhere along the way.


Time to move on to markings! I am trying a tip that I saw posted by Kenize Williamson on her Instagram account and in a NaMoPaiMo Facebook post. She drew in her pattern first. I used a light-colored pastel pencil over a layer of Krylon. The white Prismacolor pencil didn't want to stick. 


My supply order arrived early so I could keep going. This tip I saw posted by both Kenzie and Mel Miller and it is a game changer! This Faber Castell paint pen is fantastic for filling in the pattern. It has a decent tip for the edges but will need some refinement with a small paint brush. I want to refine the pattern a little more tonight. Since it is over a layer of sealer, I was able to lift some using a damp q-tip to play around with the pattern a bit. Not sure that it will work 24 hours later, but we'll see. Also, I think he needs more white on his face, and to tone down the red color coming through. Maybe a layer of raw umber...


The other side, also in need of tweaking... 
Happy that progress is being made even if there are a bazillion things I want to fix. 
7 days to go (including today)!!!


February 19, 2022

Rebel in the Making - Part 14 (pastelling!)

After airbrushing the basecoat, I found a few specks and tiny (cat) hairs in the paint, which I carefully sanded out with 1200 grit sandpaper. Then using the same paints I used for his basecoat, I mixed up fresh paint and blended the colors in. 

Then, I sealed Rebel in Krylon matte finish to seal in the paint before adding pastels. There are mixed reviews on using Krlyon sealer, but I've only had a couple bad cans over the years. I shake it for several minutes before using it on the model (and hold my breath that I don't have any problems). I spray outside (or in the garage if it's NaMoPaiMo and it's snowing outside), then let the model dry in the basement, which is not as cold as the garage, but still far enough from people that we're not breathing the fumes. 

For the first layer of pastels, I mixed some earth pigment light yellow ochre and Pearl Ex sparkle gold. I applied this with a soft Pastel Smoothie all over. Then I mixed up another batch of the same colors and added in earth pigment dark yellow ochre. This I applied over the first layer of pastels where I wanted it darker. I then sealed with Krylon matte and let dry. I generally don't use color formulas. I usually figure it out as I go, but maybe if I did a better job of keeping track of which colors I used I might be able to fine-tune the color formulas I like. I have struggled to find light pastels/pigments for buckskins and palominos that I really like. I think I'm liking these.

Next, I used Pan Pastel 820.3 neutral gray shade for the skin tones with a small paintbrush and micro brushes. I checked all over and lifted stray gray pastel off with a kneaded eraser (I do this whenever I add darker pastel, and almost always miss some, grrr!) Then I used my golden color mixes, as well as Pan Pastel white to highlight, deepen and blend the head and body color. Sealed with Krylon matte and let dry. It is easiest to with pastels to build up color from light to dark, but the white Pan Pastel is actually decent at lightening an area, which is great for blending around the muzzle and eyes. 

Layer 3 I started with a Sennelier pastel in a burnt sienna shade, not sure which one as the label is gone. I used this on his legs. I checked all over for errant color, then I did a little work on his muzzle and added more of the golden shades to try to get rid of some grain that was showing up in the dark areas. Sealed and dried. 

There are a wide variety of pastel sticks out there to choose from. I've used Derwent, which are pretty hard and don't scrape easily. Sennelier and other soft pastels are very nice. You can scrape them to mix colors, or rub the pigment directly on your brush and then directly onto the horse. Generally, the higher quality (more expensive pastels) will give you a better result as the pigment content is better. 

Layer 4 was more of the same, to build up color and eliminate grain, and adding black to his legs, muzzle and eyes. Things are really starting to come together, though he's ending up a little less "buttermilk" buckskin that I planned. 


Layer 5, 6, 7 just adding black to his legs and using some of the golden mixes to try to blend it in. 


Stopping for now. I think I'll map in his white markings before I go back with acrylic paint, or possibly pastel, to fix and tweak any areas. No sense spending time blending an area that's going to get covered up by white pinto spots, and there will be a lot of white spots. The mane and tail will be hand painted. 


Pastels are such a mess - this isn't even too bad!


Fun fact of the day:  the black pan pastels must have something metallic in them, because I have black circles where the magnets are buried in epoxy! Just goes to show how much pastel dust is flying everywhere, and like I said I always miss something when trying to pick up errant pastel with the kneaded eraser! These areas will need to be covered by acrylic paint and blended in.