February 26, 2022

Rebel in the Making - Part 17


I did a little more tweaking this morning with pastels. When I used up the Krylon matte spray can I decided I was done with the pastels. Time is running out and I needed to move on.


I added more grey and black around his eyes and muzzle, as well as ear tips. I think I'll do some more acrylic washes before he's done to help blend in the transitions. I'll try to remember to do the dark skin first next time. That should make it easier to clean up. I just love this sculpture's face!


You can see where the pastels covered up the white markings quite a bit.


So I used the white paint pen to re-outline and re-fill in the white markings. 


Other side. I changed his pattern from the first iteration by adding more white.


Then I spent the day filling in his white markings. I used Golden High Flow Acrylics, introduced by Mel Miller, which she shared during last year's NaMoPaiMo. I have a bottle of titanium white that I mixed in some titan buff to warm it up. What I like about this paint is it is fairly opaque for coverage and is pretty thin so doesn't need to be watered down. 


You can see it is very shiny, but matte spray will knock that back. What this paint is not good for is the "hair by hair" detailing, so the next step will be another layer of a different white paint to cover everything again and do the detailed mapping. First I will let this cure overnight. It is a little gummy and isn't easily sandable without peeling, but I do need to try to smooth out a few areas. My goal for this year's NaMoPaiMo was to work on my white markings. I am fairly happy with the pattern, but the jury is still out on how well they turn out.

February 25, 2022

Rebel in the Making - Part 16


Time for the tweaking stage. I wasn't loving the redness in the dark areas (must have grabbed a paint mix with burnt sienna in it when I was airbrushing!), and there were bits of dark pastel here and there where it shouldn't be. So, I first tried using some 1200 grit lightly to remove any gunk or dark pastel if it was in a top layer of sealer. Then I went over him with acrylics. 


I mixed up lots of shades trying to find the right shades, as you can see on the palettes. I used the same colors in the airbrush mixes, plus Liquitex burnt sienna, burnt umber, and mixing white. Using a combination of washes and dry brush stippling, I got him to a good spot. Then I sealed him with sealer.


I went over him all over with the light gold pastel mix to bring back the metallics over the acrylics.


Next, I wanted to add some more shading on his legs. I started by using Pan Pastel Yellow Ochre Tint 270.8 to lighten the areas. I find Pan Pastels to be the most opaque of any pigment. The above picture shows the first layer over the black before I sealed it. I went through a few layers of adding the yellow to get it lighter, then I added Pan Pastel Burnt Sienna Ex. Dark 740.1 with the yellow ochre to blend the transitions. Then I used the darker golden pastel mix over the lighter areas. If I had planned ahead, I could have avoided this step of trying to lighten had I been more strategic in where I placed the dark pigment the first time. I didn't realize I wanted them shaded until I decided they were too dark...


The picture is terribly dark, so you can't really see but... After the legs were done, I used Pan Pastel Neutral Gray 820.3 on his muzzle and around his eyes (again). This time more carefully! And I added a bit of black to his ear tips. I'll take a second look in the morning to see if I want to do any more tweaking (and really hope I don't find any more stray black pastel - I made sure to check his magnets this time!). Then I really need to get going on his white markings! 3 days left of NaMoPaiMo, 1 of which is a workday, so really only 2 days left to paint in earnest! I am so excited to see him starting to come together!

February 22, 2022

Rebel in the Making - Part 15


Inevitably, on closer inspection after applying pastel, there is a lot of clean-up work. Even trying to remove pastel with a kneaded eraser where I don't want it as I go along, If I hurry at all, it backfires. Also, taking a look with fresh eyes with sunlight makes a world of difference. In the picture above, the dark skin color around his eye is too sloppy for my taste.

I spent all afternoon on Sunday trying to cover and blend in the area around his eyes using acrylic paints. I was waiting on an art supply order to do his white markings so I also started painting his eyes. Not happy with them yet. I think they're too dark and I lost his eye whites somewhere along the way.


Time to move on to markings! I am trying a tip that I saw posted by Kenize Williamson on her Instagram account and in a NaMoPaiMo Facebook post. She drew in her pattern first. I used a light-colored pastel pencil over a layer of Krylon. The white Prismacolor pencil didn't want to stick. 


My supply order arrived early so I could keep going. This tip I saw posted by both Kenzie and Mel Miller and it is a game changer! This Faber Castell paint pen is fantastic for filling in the pattern. It has a decent tip for the edges but will need some refinement with a small paint brush. I want to refine the pattern a little more tonight. Since it is over a layer of sealer, I was able to lift some using a damp q-tip to play around with the pattern a bit. Not sure that it will work 24 hours later, but we'll see. Also, I think he needs more white on his face, and to tone down the red color coming through. Maybe a layer of raw umber...


The other side, also in need of tweaking... 
Happy that progress is being made even if there are a bazillion things I want to fix. 
7 days to go (including today)!!!


February 19, 2022

Rebel in the Making - Part 14 (pastelling!)

After airbrushing the basecoat, I found a few specks and tiny (cat) hairs in the paint, which I carefully sanded out with 1200 grit sandpaper. Then using the same paints I used for his basecoat, I mixed up fresh paint and blended the colors in. 

Then, I sealed Rebel in Krylon matte finish to seal in the paint before adding pastels. There are mixed reviews on using Krlyon sealer, but I've only had a couple bad cans over the years. I shake it for several minutes before using it on the model (and hold my breath that I don't have any problems). I spray outside (or in the garage if it's NaMoPaiMo and it's snowing outside), then let the model dry in the basement, which is not as cold as the garage, but still far enough from people that we're not breathing the fumes. 

For the first layer of pastels, I mixed some earth pigment light yellow ochre and Pearl Ex sparkle gold. I applied this with a soft Pastel Smoothie all over. Then I mixed up another batch of the same colors and added in earth pigment dark yellow ochre. This I applied over the first layer of pastels where I wanted it darker. I then sealed with Krylon matte and let dry. I generally don't use color formulas. I usually figure it out as I go, but maybe if I did a better job of keeping track of which colors I used I might be able to fine-tune the color formulas I like. I have struggled to find light pastels/pigments for buckskins and palominos that I really like. I think I'm liking these.

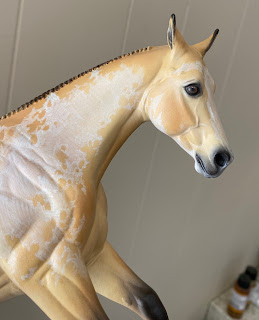
Next, I used Pan Pastel 820.3 neutral gray shade for the skin tones with a small paintbrush and micro brushes. I checked all over and lifted stray gray pastel off with a kneaded eraser (I do this whenever I add darker pastel, and almost always miss some, grrr!) Then I used my golden color mixes, as well as Pan Pastel white to highlight, deepen and blend the head and body color. Sealed with Krylon matte and let dry. It is easiest to with pastels to build up color from light to dark, but the white Pan Pastel is actually decent at lightening an area, which is great for blending around the muzzle and eyes. 

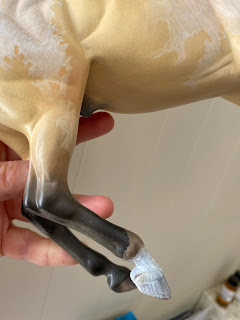
Layer 3 I started with a Sennelier pastel in a burnt sienna shade, not sure which one as the label is gone. I used this on his legs. I checked all over for errant color, then I did a little work on his muzzle and added more of the golden shades to try to get rid of some grain that was showing up in the dark areas. Sealed and dried. 

There are a wide variety of pastel sticks out there to choose from. I've used Derwent, which are pretty hard and don't scrape easily. Sennelier and other soft pastels are very nice. You can scrape them to mix colors, or rub the pigment directly on your brush and then directly onto the horse. Generally, the higher quality (more expensive pastels) will give you a better result as the pigment content is better. 

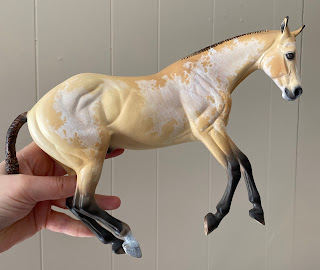
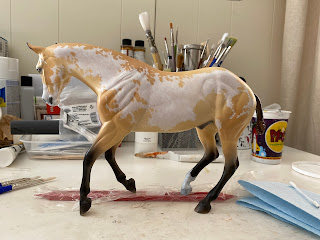
Layer 4 was more of the same, to build up color and eliminate grain, and adding black to his legs, muzzle and eyes. Things are really starting to come together, though he's ending up a little less "buttermilk" buckskin that I planned. 


Layer 5, 6, 7 just adding black to his legs and using some of the golden mixes to try to blend it in. 


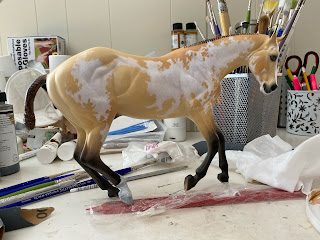
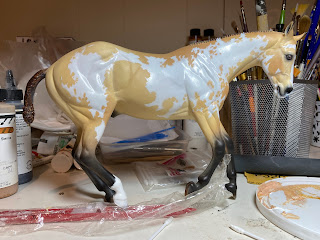
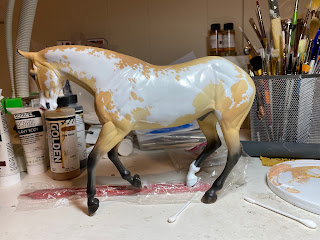
Stopping for now. I think I'll map in his white markings before I go back with acrylic paint, or possibly pastel, to fix and tweak any areas. No sense spending time blending an area that's going to get covered up by white pinto spots, and there will be a lot of white spots. The mane and tail will be hand painted. 


Pastels are such a mess - this isn't even too bad!


Fun fact of the day:  the black pan pastels must have something metallic in them, because I have black circles where the magnets are buried in epoxy! Just goes to show how much pastel dust is flying everywhere, and like I said I always miss something when trying to pick up errant pastel with the kneaded eraser! These areas will need to be covered by acrylic paint and blended in.

February 13, 2022

Rebel in the Making - Part 13 (airbrushing!)

Confession: I am totally intimidated by the airbrush. I tend to procrastine airbrushing, a lot, but it's NaMoPaiMo and there is no time like the present.


This is my makeshift airbrush booth in my basement. The cardboard is meant to keep overspray from spreading. I wear a mask and I don't spray any toxic paints like cadmium. I brought in a little space heater today since the basement was a chilly 54 degrees.

I switched to using an Iwata Neo recently, which is much less finicky than my other 2 airbrushes, an Iwata CM-C plus and an Iwata HP-B. I sent the latter two off to Iwata for cleaning and repairs to make sure they were good to go. After spending a small fortune, they both clogged the first time I tried to use them, again.

I use a Silentaire airbrush compressor, which was recommended to me by Tiffany Purdy many years ago. I held my breath when the basement flooded since it sits on the floor, but thankfully it still works! Hooray!!! This has been (knock on wood) the least problematic part of airbrushing. It really is wonderfully quiet.


One of my all time favorite colors for basecoating is Jo Sonja's Unbleached Titanium which I applied on the entire model. I could not get Jo Sonja paint to work in the more expensive airbrushes, but the Neo (so far) has worked like a champ. Since this is a heavier body acrylic I use airbrush medium and a little water to thin it to skim milk consistency in a small plastic cup.


Since NaMoPaiMo is all about challenging yourself, I'm also going for a shaded basecoat. For the pangare areas, I mixed some Golden High Flow Acrylic Titanium White and Titan Buff to create a lighter color. Thanks to Mel Miller for sharing Golden High Flow Acrylics in a NaMoPaiMo post from a prior year. They have good coverage for hand painting, and can go into the airbrush without any thinning. 


And because you spend as much time cleaning your airbrush as you do painting, I always try to make it worth my while and basecoat several models at once. The model at the bottom right is covered in plastic wrap, as I resculpted the base of her tail, which impacted some of the body color. I'm trying to blend the area into the surrounding color, while protecting most of her existing paint job. We'll see how it goes...


I also mixed up a third color for the darker areas, which was a combination of Titanium White, Titan Buff, and Raw Sienna. Above are all the paint colors I used in my shaded basecoat. Yes, I'm very messy.


The lighting is not great, but I think I'm happy with him so far. 
After he dries, I'll seal him with fixative. 


The aftermath. 
I had mixed up some burnt umber to add to his legs, but it didn't blend well and I chickened out. I'll probably go with my mainstay, pastels, to do his points. They are a messy pain that requires careful attention to not get any where you don't want it, but I feel like I have better control with pastels. 


Cleaning is probably the most important part of airbrushing. I've started using an ultrasonic cleaner at the advice of others, but it doesn't work miracles for me like it apparently does for them. It probably does help. The picture above is the teeny tiny nozzle on the tip of this little airbrush cleaning tool. I feel like the little nozzle is the heart of the airbrush. If it's not clean, you can just forget about it. It's easily dropped (and lost). And I've overtightened one more than once and broken it off inside the airbrush. Since I had to learn the same lesson twice, maybe the following advice will help someone else. If you have one, don't use the Nozzle Wrench to put the nozzle back on the airbrush, only use it to remove the nozzle for cleaning. The first time I was able to get it out with an exacto knife using a YouTube video. The second time was the impetus for sending the airbrushes to Iwata. Still for all the annoyance it can be, I am very glad that everything worked today and Rebel got his basecoat on!

February 11, 2022

Rebel in the Making - Part 12 (prepping!)

Prepping is a very time-consuming process with lots of filling, sanding, priming, drying, filling, sanding, priming, drying, repeat ad nauseum. When you introduce epoxy work to your model, getting a feather smooth blend where the plastic (or resin) meets the epoxy is just one more challenge. It's helpful to keep sanding and prepping as you are customizing, which I've tried to do. And just when you think you're done, you find something else to tweak.


I've covered my prepping process before, but a quick refresh of the supplies I use can't hurt. These are staples of my prepping arsenal that I highly recommend: 

1) A good respirator for spraying primer
2) A good dust mask (N95 is great if you have one) for sanding
3) Liquitex modeling paste for filling airholes, seams, etc. Keep the top on, it dries fast! It is white, water-soluble which helps with application, and sands nicely - win, win, win!
4) Plastic gloves to hold the model when priming to keep primer off your skin. Use a fresh one each time.
5) Sandpaper in lots of grit from 80 or lower for going nuts on rough epoxy to 600 or higher for final touches. I tear it off in little bits and fold it or round it to get into all the little areas. 
6) Carbide scrapers for removing seams, carving out ears & hooves, detailing wrinkles, manes & tails, etc. I have the Rio Rondo set and several from Kelly. I like and use a few tips most often, but it's good to have options. They are a worthwhile investment if you plan to customize and prep models. 
7) Primer - 3 brands I recommend are Duplicolor Sandable Primer, which is fairly new to me. It goes on very thin, which is great for micros; Rustoleum Sandable Primer, which I've been using for yeeeaaars; and Tamiya Fine Surface Primer, which also has a very fine spray good for micros and small models. The latter being the most expensive in a very small can, so I'm currently seeing if I like the Duplicolor enough to go with that going forward. So far, I think the Tamiya goes on smoother and the Duplicolor goes on a little grainier. The Rustoleum tends to go on a little heavier, so I use that on larger models. Many layers makes for good priming. 
8) I forgot to put it in the photo, but you'll also need a good cleanser to wash the model before you prime. I like non-scratching Comet & Bar Keeper's Friend, both in powder form that I use to make a paste with water.  Use a toothbrush to get into all the nooks and crannies, followed by a good rinse. 


Another thing I've started to do with micros, is to lay them all on one side in a box lid on aluminum foil. I spray them all on this side from all four sides of the box and let them cure, I turn them over on a fresh piece of aluminum foil and repeat on the other side. When I get a few layers in, I'll hold them by the head with a gloved hand and spray the back-half from all angles. Then when dry, repeat with the other side. Goal is to get an even coat of primer over all parts of the horse. So far, so good.

February 4, 2022

Rebel in the Making - Part 11

 Lots of figuring it out as I go. I find much of the creative process is problem-solving. Since I haven't made interchangeable manes and tails before, this is taking longer than I hoped!

I started out by covering up his neck and tail with plastic wrap. Then using a tip that Kylee Parks shared in her BreyerFest making manes tutorial from a couple years, I squished SuperSculpey into the crevices of his braids so that the epoxy is sitting a little on top of the braids. Then added another layer of plastic wrap.

Using some fine mesh made for sculpting, I started shaping all the various manes and tails. 

Shaping them over the model. 

Next I mixed up some epoxy.

And squished it into the underside of each form, trying to use as little epoxy as possible. 

Next I wrapped the magnets in fresh epoxy and let them stick into place. 

Then I pushed the mane/tail form into place. 

For his short mane, I was able to keep going and work on the top of the mane. 


Short mane finished and left to cure.


Many more to go...


The others are taking multiple sculpting sessions.


Pleasure Rebel


Reining Rebel

Much as I wanted to get all the manes and tails done before I prep and paint him, I think I'm going to have to switch gears if I have any hope of painting him for NaMoPaiMo. I'm just going to have to be incredibly careful not to get epoxy on him...