I took what would have been my BreyerFest Best Customs Contest creation to a local show last weekend, so my planned slow reveal is out of the question. I still love to share a bit of the behind-the-scenes creation aspect, so here we go!
Before I even left Kentucky for BreyerFest 2023, I was already scheming what I wanted to do for my next BCC entry. I settled on a Fantasy entry and eventually came to the idea of story-telling with a bas-relief pillar. I didn't start right after I got home, but I was thinking big and started gathering materials.
I started construction in the fall of 2023. The original design was over 5 feet tall with a traditional scale dragon and pegasus and Little Bit scale models for the pillar.
 |
| Version 1 roughed out at 5+ feet tall! |
 |
| Some of the pieces from the original plan - NONE of these made it into the finished piece. This was meant to be the "before" picture. |
Much of the construction phase involved problem-solving. For frequent readers of my blog, you may have noticed this theme. So much of the creative process is problem-solving! In the above picture, I'm trying to figure out the support structure to have a single point of contact with the pillar that will support the weight of a full-size model in flight with giant wings! Using a rod through the leg(s) worked well with Tootsers, so I started with that approach for the pegasus. (Shout out to Sarah Minkiewicz for mentioning Free Form Air in her newsletter, which I used in place of magic sculpt in the bulking-up areas to cut down on the total weight!)
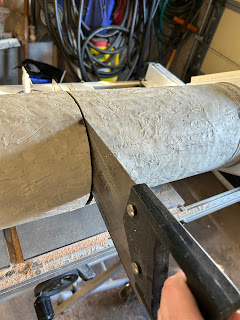
Sometime in the midst of construction, the BCC contest rules were released, which included a height limit of only 2 feet for the first time. I was bummed, but not overly surprised given the rearing life-sized miniature horse entry the year before. So, I pulled out a saw and chopped the darn thing in half!
The prior pillar design was now out of scale, so I popped off the models I had already attached to the pillar and sanded down the carving to start over.
Fun fact - I used 10 different power tools on this project: table saw, miter saw, circular saw, orbital sander, finishing sander, electric stapler, heat embossing tool, power drill, dremel, and Cricut. Okay, so maybe that last one is a stretch as a power tool, lol...
Speaking of the Cricut, I used it to make templates for the Greek motifs and letters, then used the dremel to carve them.
Using the Greek theme was intentional as per the BCC rules "judging is on creativity of concept and execution." Per Wikipedia, the ancient Greek concept of four basic elements, are "earth (γῆ gê), water (ὕδωρ hýdōr), air (ἀήρ aḗr), and fire (πῦρ pŷr), which dates from pre-Socratic times and persisted throughout the Middle Ages and into the Early modern period, deeply influencing European thought and culture."
The concept I was going for was to represent the Greek elements through mythical creatures. Pegasus, the winged horse from Greek mythology, represents air. The concept of fire-breathing dragons can be traced back to various mythologies around the world, including Shamira in Greek-Roman mythology. I chose unicorns and centaurs to represent Earth, which are both represented in Greek mythology. Finally, the merhorse or hippocampus represents water and is often depicted in Greek mythology drawing Poseidon's chariot.
Someone at the show asked me what I used to make the pillar. My reply was a little bit of everything and I wasn't kidding. Since the original top had to be replaced, I used the cord from a power strip to make the ring at the top. Of course, primer didn't stick to it, even with Mr. Super Clear sprayed on first, so I had to sculpt over it (more problem-solving!).
More to come on Version 2...


I love these behind-the-scenes/how-to posts.
ReplyDeleteI can't wait to read the next installment.